Postman use proxy setup in v12 takes four steps: open Settings > Proxy, select the route, add credentials, then check the egress address.
This is a desktop-app workflow. Postman's official proxy guide says the default proxy cannot be configured in the web app and directs readers to install the desktop app. A live check of go.postman.co/home reached Postman sign-in and did not expose the native Settings > Proxy control.
Key takeaways
Choose one route first. Keep the machine-wide settings when they already fit; configure Postman's own gateway when the app needs separate connection details.
Custom settings take precedence. If system and custom proxy options are both on, Postman uses the custom configuration.
Treat 407 as an authentication clue. Check the username, password, and IP allowlist before changing unrelated request settings.
Prove the route with the exit IP. A successful API response alone does not show which network path carried the request.
Choose the right Postman proxy path
The current v12 documentation presents three desktop paths: the default proxy behavior, an explicit system proxy, and a custom proxy. The right choice depends on where you want the routing decision to live.
Default proxy: Postman uses the system proxy by default. This is the least work when the operating system is already configured correctly.
System proxy: Select Use system proxy to make the app follow the system settings and supported proxy environment variables.
Custom proxy: Select Use custom proxy configuration to give this Postman installation its own gateway and connection options, including authentication and bypass rules.
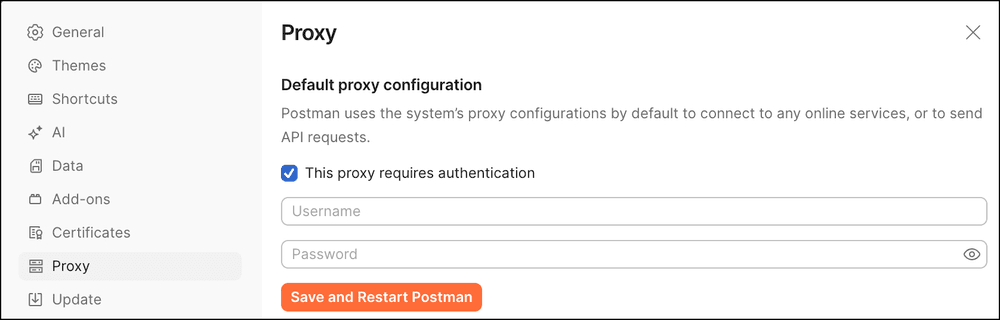
Open the Postman desktop app, select Settings, open the Proxy tab, and review the default proxy configuration.
Postman v12 uses the system proxy by default; add basic-auth credentials here only when your system proxy requires them.
The default panel also contains basic-auth fields. Leave them empty if the system proxy does not require credentials. If it does, enter only the proxy account details; these are separate from any API key, bearer token, or login used by the destination API.
Configure Postman to use the system proxy
Use the system path when the same proxy should serve Postman and other desktop applications. It keeps proxy ownership in one place and reduces the chance that the operating system and Postman silently point to different gateways.
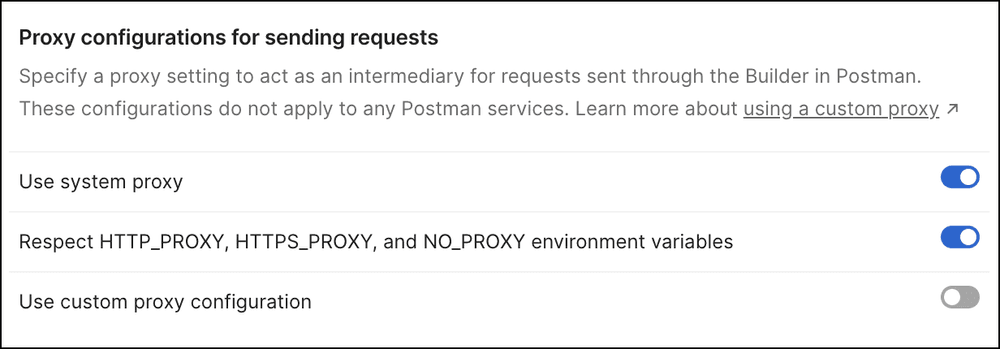
For the system-proxy path, turn on Use system proxy and leave Use custom proxy configuration turned off.
Enable the system proxy path when Postman should use the proxy already configured for your operating system.
Then run this short check:
Confirm the operating system proxy is active and points to the intended gateway.
Open Settings > Proxy in Postman and enable Use system proxy.
Keep Use custom proxy configuration off so there is no override.
Send one request to an endpoint you are authorized to test.
Compare the response and exit IP with a direct connection.
If the request still goes direct, inspect the operating system settings and any proxy environment variables used by the desktop app. If only one hostname bypasses the proxy, review the bypass list before changing the gateway.
Enter Postman's custom proxy settings
The custom path is easier to audit because the route is visible inside Postman. It is also the practical choice when you want the API client to use a proxy without changing the rest of the computer. If the fields are unfamiliar, review the proxy server settings field guide before entering values.
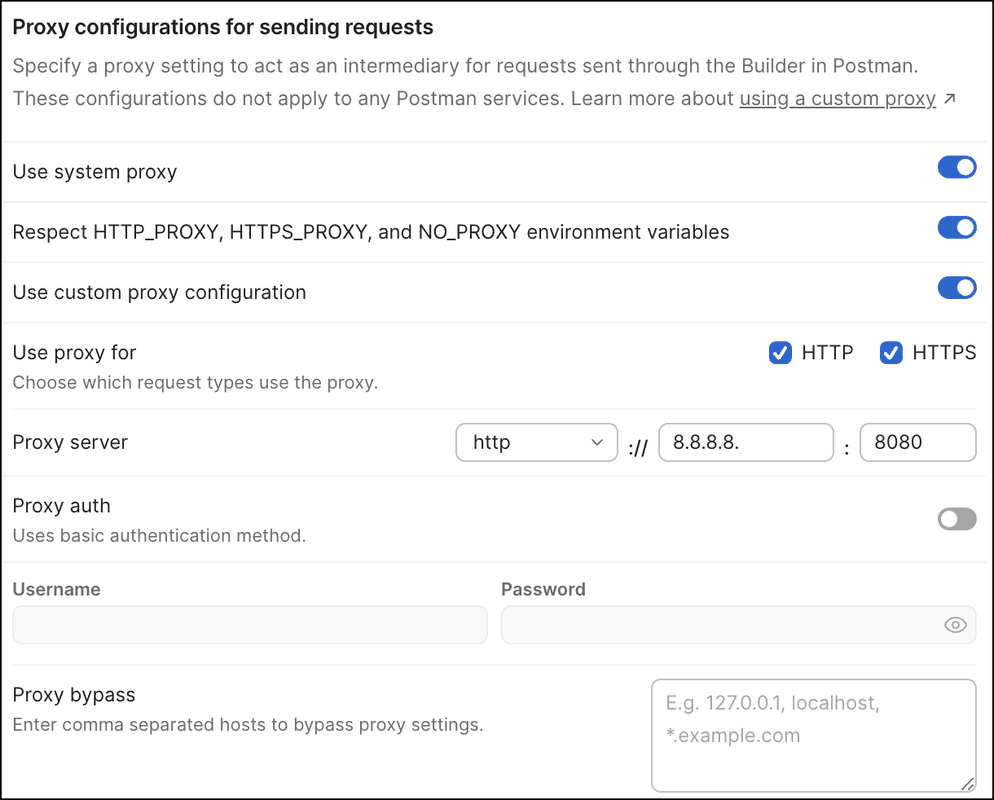
For a custom proxy, enable Use custom proxy configuration, choose HTTP or SOCKS, then enter the host, port, and basic-auth credentials supplied for your proxy.
Enter the proxy protocol, host, port, and optional basic-auth details, then add bypass hosts only when the workflow requires them.
Fill the fields in this order:
Proxy type: Choose HTTP for ordinary HTTP and HTTPS API requests. Postman's documented custom menu also includes SOCKS4, SOCKS4A, SOCKS5, and SOCKS5H when that route is required.
Host: Enter only the proxy hostname or IP address. Do not include http://, a path, or credentials in the host field.
Port: Enter the assigned proxy port as digits. ColdProxy's connection guide documents a range of 30,000-34,999; type a value such as 30000 without commas.
Authentication: Enable proxy authentication when the route uses username and password. Copy both values exactly and keep them out of shared screenshots or collections.
Bypass list: Add only hosts that must connect directly. A broad bypass pattern can make a test look successful while avoiding the proxy entirely.
The Postman v12 proxy documentation says a custom configuration overrides the system proxy when both options are enabled. That makes the custom toggle the first place to look when the operating system proxy appears to be ignored.
A composite ColdProxy configuration example
This example combines values shown in ColdProxy's public connection documentation. It is a teaching example, not a usable account. Replace every value with the credentials and gateway assigned to your service.
Proxy type: HTTP
Host:gw-2312.coldproxy.com
Port:30000
Username:example-user
Password:example-password
Bypass: leave empty for the first controlled test
ColdProxy supports HTTP, HTTPS, and SOCKS5 on the same documented endpoint and port range. If you are unsure which protocol to select, start with HTTP for Postman requests, confirm the exit IP, and change one variable at a time. The authentication guide explains the difference between username-password and IP authentication.
Keep the first request simple. Use a read-only endpoint you own or have permission to test. Avoid placing real secrets in public workspaces, console screenshots, example collections, or third-party echo services.
Verify the route, authentication, and exit IP
Use a route-auth-proof check after saving the settings:
Route: Did the request reach the destination without a connection or DNS error?
Authentication: Did the proxy accept the credentials without returning 407?
Proof: Does the observed exit IP match the expected proxy route and location?
For a baseline, open the ColdProxy My IP tool without the proxy and record the public IP. Then send a GET request from Postman to https://api.vipv6proxy.com/api/checker/my-ip. The JSON response gives the routed IPv4 exit IP and location fields. Compare it with the baseline and the location you expected.
A 200 response proves the destination replied. It does not prove the proxy carried the request; a bypass rule or disabled toggle can still send it directly. The exit-IP comparison closes that gap. For a separate reachability check, use the Proxy Checker and compare its IPv4 or IPv6 result.
When authentication fails, the MDN 407 Proxy Authentication Required reference says the request "lacks valid authentication credentials for the proxy". In practical terms, the proxy rejected or never received the expected authentication details.
RFC 9110, HTTP Semantics (2022) requires a 407 response to include Proxy-Authenticate, which tells the client how the proxy expects authentication. The client can then repeat the request with Proxy-Authorization after you correct the credentials or authentication method.
Troubleshoot the common failure modes
Postman returns 407 Proxy Authentication Required
Re-enter the proxy username and password, check for copied spaces, and confirm that the account is active. If the service uses IP authentication, verify that the current source IP is allowlisted. Do not rotate API keys for the destination; a 407 comes from the proxy hop.
The request times out
Check the proxy protocol, hostname, and port as one set. A valid host with the wrong port can look like a network outage. For SOCKS, remember that Postman's official guide limits SOCKS proxying to HTTP and HTTPS requests. Test a simple GET before debugging a complex collection.
The request succeeds but shows the direct IP
Confirm that the intended proxy toggle is on. For a custom setup, check that Use custom proxy configuration remains enabled. Then inspect the bypass list for the destination hostname. Remove only the mistaken bypass entry; keep intentional direct routes.
The proxy works elsewhere but not in Postman
Compare the other client's protocol and authentication method with Postman's fields. A browser extension, operating system proxy, and native API client can use different settings on the same computer. Recreate the known-good route in Postman one field at a time.
The web app has no matching proxy panel
Use the Postman desktop app for this workflow. Postman's documentation keeps the native proxy controls in that client and tells browser-only users to install it. Signing in through the web surface does not add the Settings > Proxy panel described here.
Final setup checklist
Install and open the Postman desktop app.
Open Settings > Proxy.
Choose system or custom routing and avoid an accidental override.
Enter the gateway hostname and assigned port in separate fields.
Add basic-auth credentials only when the proxy requires them.
Keep the first bypass list empty unless a direct route is intentional.
Record the direct public IP, send one proxied GET, and compare the exit IP.
Test only endpoints and data you are authorized to access, and respect site terms and rate limits.
Put the configuration into one controlled test
Start with one read-only endpoint, one proxy route, and one expected location. Save the result with the chosen settings so the next person can reproduce it. If you still need a service, compare ColdProxy pricing options by proxy type and billing model before repeating the test with real credentials.
Frequently Asked Questions
Can I configure these proxy settings in the Postman web app?
Use the desktop app for the workflow in this guide. Postman's current documentation directs web users to the desktop download because the documented default proxy controls are not configurable there. The native Settings > Proxy controls and the three screenshots here come from the v12 desktop documentation.
Should I use the system proxy or a custom proxy in Postman?
Use the system proxy when Postman should share the operating system's existing route. Use a custom proxy when Postman needs a separate host, port, protocol, authentication pair, or bypass list. With both switches enabled, Postman documents that the custom fields take precedence.
What causes a 407 error in Postman?
A 407 means the proxy did not accept valid authentication for the request. Common causes are a missing or mistyped username and password, credentials that the client did not send, or a source IP that is not allowlisted. Check the proxy authentication method before changing destination API credentials.
How do I confirm Postman is really using the proxy?
Record your direct public IP first. Issue one GET from Postman to the ColdProxy IPv4 echo endpoint, then compare the returned exit IP and location. A normal API response is not enough because a bypass rule can still send the request directly.
Share this article:
ColdProxy Team
Content Team
The ColdProxy Content Team consists of proxy-service experts, developers, and technical writers dedicated to providing clear, accurate insights on web scraping, online privacy, and advanced proxy technologies.